Introduction
Welcome to the Doc2Cart API documentation. Doc2Cart is a service that helps you quickly transform documents containing product information into actionable data, which can be used to add those products to your e-commerce cart.
The core idea behind the platform is straightforward:
- The document analysis workflow is split into several steps, each handled by dedicated endpoints that you must coordinate. These steps include uploading the document, analyzing it for product data, and retrieving structured results.
- Additionally, we provide a wizard endpoint that offers a graphical user interface to unify these steps. This wizard can be embedded into your own application, making it easier to map and validate extracted data before adding products to the cart.
- All endpoints are prefixed with
/api, and every request must be authenticated and signed for security.
This documentation will guide you through authentication, available endpoints, response formats, and how to integrate Doc2Cart into your workflow.
Authentication
To ensure secure access to the Doc2Cart API, every request must be authenticated using an API key and a digital signature. Authentication is a three-step process that involves obtaining API keys, including required headers in each request, and generating a valid signature.
API Keys
Users can generate API keys directly from their account panel under Account → API Keys. Each key pair consists of:
- Public Key: Used to identify your application when making API requests.
- Secret Key: Used to generate a signature for each request. This key must remain confidential and should never be exposed in client-side code.
You can create multiple key pairs, which can be managed from the API Keys page. If a key is compromised, revoke it immediately and generate a new one.
Below is an example of the API Keys management interface:
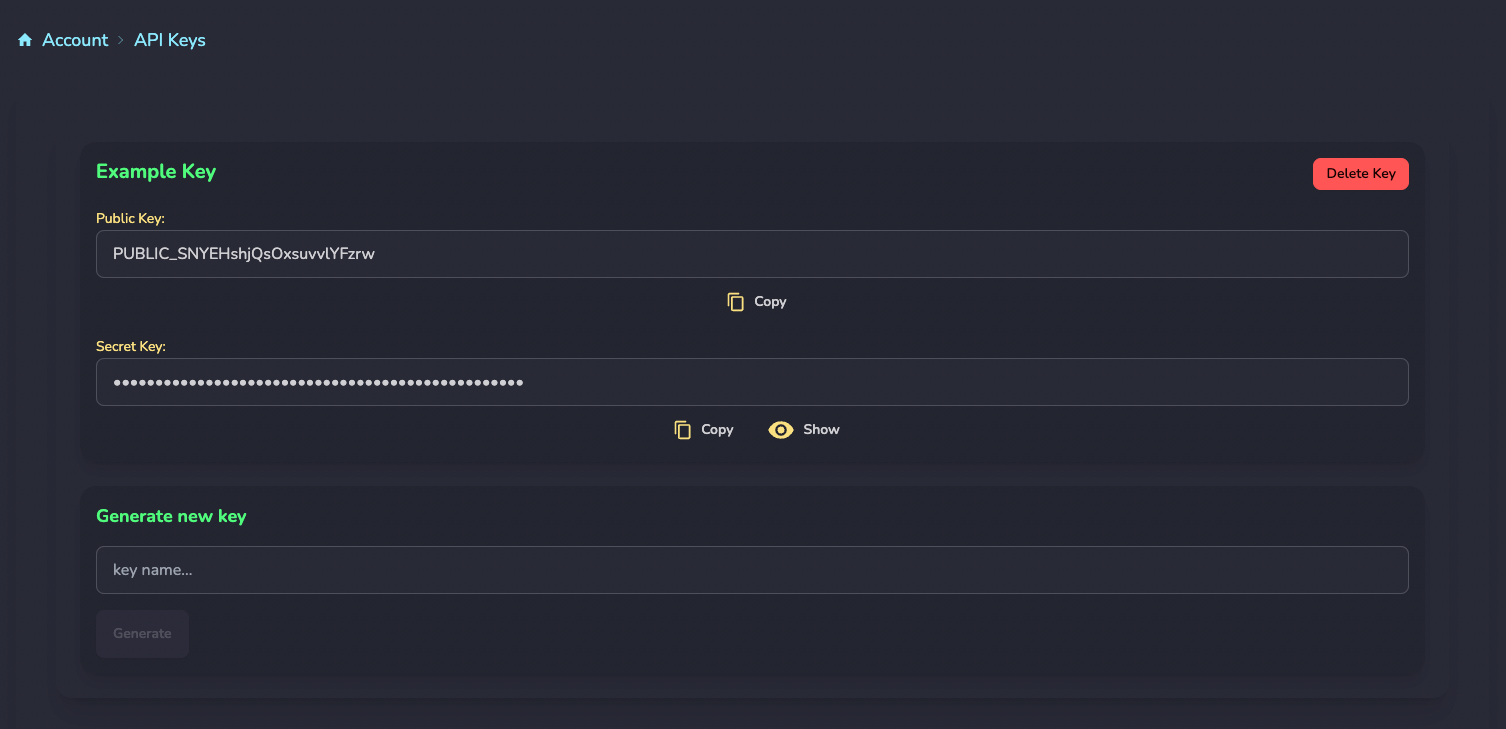
Once a pair of keys is generated, use the public key in the X-Api-Key header and the secret key to generate a signature for your requests.
Signature Generation
The X-Signature header is a digital signature generated using your secret key.
This signature is used to verify the authenticity and integrity of each request.
The signature is based solely on the UNIX timestamp sent in the X-Timestamp header.
Follow these steps to generate the signature:
-
Concatenate the timestamp as a string:
const timestamp = Math.floor(Date.now() / 1000).toString(); // Current UNIX timestamp -
Use HMAC-SHA256 to hash the timestamp with your secret key and encode the result in Base64:
const crypto = require('crypto');

const secretKey = 'SECRET_XXXXXX'; // Your secret API key
const timestamp = '1636544896'; // Example UNIX timestamp

const signature = crypto
    .createHmac('sha256', secretKey)
    .update(timestamp)
    .digest('base64');

console.log('Generated Signature:', signature);
Ensure the signature matches the one expected by the server. The server validates the signature using the same algorithm and your secret key. Any discrepancy will result in an authentication failure.
Important: Ensure that your endpoint for generating signatures is secure. For example, if your store
provides a public shopping cart accessible to unauthenticated users, and you expose a signature generation
endpoint like https://your-shop/generate-signature, take the following precautions:
- Restrict CORS: Ensure that only your domain can access the endpoint. This prevents requests from other domains from generating signatures.
- Secure Access: Use server-side authentication (e.g., require a logged-in user or an internal token) to restrict access to the endpoint.
- Monitor Usage: Log and monitor requests to the endpoint for any unusual or unauthorized access patterns.
Failure to secure the signature generation endpoint could allow malicious users to generate valid signatures for unauthorized requests.
Headers
Each request to the Doc2Cart API must include the following headers to ensure secure communication and prevent tampering:
| Header | Description | Example |
|---|---|---|
X-Api-Key |
Your public API key to identify your application. | PUBLIC_SNYEHshjQsOxsuvvlYFzrw |
X-Timestamp |
The current UNIX timestamp in seconds. Used to prevent replay attacks. The server will reject requests older than 10 minutes. | 1734209240 |
X-Signature |
A digital signature of the X-Timestamp, generated using your secret key.
|
jhJXLxnfY7NFSrfrVEAcbPOw3lxcdqYz9MXJLwO8DbI= |
Below is an example of how the headers might look in a request:
GET /api/document/analysis-wizard HTTP/1.1
Host: api.doc2cart.com
X-Api-Key: PUBLIC_SNYEHshjQsOxsuvvlYFzrw
X-Timestamp: 1734209240
X-Signature: jhJXLxnfY7NFSrfrVEAcbPOw3lxcdqYz9MXJLwO8DbI=
Quick Start
This quick start guide will help you make your first request to the Doc2Cart API. The goal is to show you how to access the analysis wizard endpoint, which provides a graphical interface for document analysis and extracting data.
Before you start, ensure you have:
- An API key pair (public and secret) used to generate the required
X-Signature. - A valid
X-TimestampandX-Api-Keyheader.
For a detailed explanation of how to generate signatures and handle authentication, please see the Authentication section. For now, assume you have these values.
The endpoint we’ll call is:
GET /api/document/analysis-wizard HTTP/1.1
Host: doc2cart.com
X-Api-Key: PUBLIC_XXXXXX
X-Timestamp: 1234567890
X-Signature: <generated_signature>
When you send this request, you’ll receive an HTML response that can be embedded into your own application as an iframe, or processed as needed. For now, let's just log the response to the console using plain JavaScript:
// Replace with your actual values
const publicKey = 'PUBLIC_XXXXXX';
const timestamp = Math.floor(Date.now() / 1000).toString(); // current timestamp in seconds
const signature = ''; // generated from your secret key and timestamp

fetch('https://doc2cart.com/api/document/analysis-wizard', {
    method: 'GET',
    headers: {
        'X-Api-Key': publicKey,
        'X-Timestamp': timestamp,
        'X-Signature': signature
    }
})
.then(response => {
    if (!response.ok) {
        throw new Error(`Server returned status: ${response.status}`);
    }
    return response.text();
})
.then(html => {
    console.log('Received wizard HTML:', html);
    // You can now embed this HTML in an iframe or directly into your page
})
.catch(error => {
    console.error('Error fetching the wizard:', error);
});
That’s it! You have successfully made your first API call and obtained the analysis wizard HTML. Next steps might include:
- Embedding the returned HTML into an iframe on your page.
- Listening for events from the iframe and handling the results accordingly. For more details, refer to the Wizard section.
When you're ready to explore more details, including how to properly generate signatures, upload documents, and process results, head over to the other sections of this documentation.
API Overview
All endpoints in the Doc2Cart API start with the base path /api.
Each request must be signed and include the required authentication headers.
The API adheres to a consistent response structure to simplify integration and error handling.
Authentication Requirements
Every request must include the following headers:
X-Api-Key: Your public API key.X-Timestamp: The current UNIX timestamp.X-Signature: A signature generated using your secret key and the timestamp.
For more details on generating signatures, refer to the Signature Generation section.
Response Structure
The following response structures are used in the API:
-
Success: For successful requests:
{ "message": "ok", // Or a more detailed success message "data": { ... } // Response data specific to the endpoint } -
Error: For requests that fail due to logical errors or exceptions:
{
  "generalErrors": [
    "Error message 1",
    "Error message 2"
  ],
  "fieldErrors": []
}
General Errors: A list of general error messages.
Field Errors: A list of field-specific errors with the field name and corresponding error message.
-
Validation Errors: For validation failures:
{
  "generalErrors": [],
  "fieldErrors": [
    {
      "field": "email",
      "message": "This value is not a valid email address."
    },
    {
      "field": "token",
      "message": "This value should not be blank."
    }
  ]
}
Validation errors use the same structure as general errors, with detailed field-specific error messages.
-
HTML Views: For endpoints returning rendered HTML (e.g., wizards or interfaces):
HTTP/1.1 200 OK
Content-Type: text/html
Next Steps
Depending on your integration needs, follow one of the paths below to get started with document analysis in the most efficient way:
- Quick Integration: If you want a fast and straightforward way to integrate document analysis into your application, proceed to the Analysis Wizard section. The wizard provides a pre-built, user-friendly UI to handle document upload, analysis, and result selection with minimal setup.
- Custom Workflow: If you require a tailored workflow or a fully customized user interface to fit your specific needs, explore the Document Analysis section. This approach allows you to directly interact with individual endpoints for uploading, analyzing, and processing documents.
Upload Document
This endpoint allows you to upload a document for analysis. Supported file types include PDFs and images. Upon successful upload, the API returns a unique token to identify the uploaded document.
Endpoint Details
| Endpoint: | /api/document/upload |
| Method: | POST |
| Header | Description | Example |
|---|---|---|
X-Api-Key |
Your public API key to identify your application. | PUBLIC_SNYEHshjQsOxsuvvlYFzrw |
X-Timestamp |
The current UNIX timestamp in seconds. | 1734209240 |
X-Signature |
A signature generated using your secret key and the timestamp. | jhJXLxnfY7NFSrfrVEAcbPOw3lxcdqYz9MXJLwO8DbI= |
Parameters
| Parameter | Type | Description |
|---|---|---|
document |
file | The document to upload. Allowed MIME types: application/pdf, image/jpeg, image/png, image/tiff, image/x-tiff. |
identity |
string (optional) | An optional identifier for the analysis, displayed later in your account's usage section. Maximum length: 255 characters. |
Success Response
{
  "message": "ok",
  "data": {
    "token": "UNIQUE_DOCUMENT_TOKEN"
  }
}
The response includes a unique token to identify the uploaded document. Keep this token for use in subsequent requests.
Identity in Usage Section
If the identity parameter is provided, it will appear in Account → Usage to help you track the analysis.

Get Document Analysis Results
This endpoint retrieves the OCR analysis results for a previously uploaded document. The response contains tables extracted from the document, representing raw data identified by the OCR process. If the analysis is still in progress, the response will indicate that the results are not yet available. Note: These results are raw and have not yet been filtered or selected by the user for further processing.
Endpoint Details
| Endpoint: | /api/analysis/results |
| Method: | POST |
| Header | Description | Example |
|---|---|---|
X-Api-Key |
Your public API key to identify your application. | PUBLIC_SNYEHshjQsOxsuvvlYFzrw |
X-Timestamp |
The current UNIX timestamp in seconds. | 1734209240 |
X-Signature |
A signature generated using your secret key and the timestamp. | jhJXLxnfY7NFSrfrVEAcbPOw3lxcdqYz9MXJLwO8DbI= |
Parameters
| Parameter | Type | Description |
|---|---|---|
token |
string | The unique token received from the Upload Document endpoint. |
Success Response
{
  "message": "ok",
  "data": {
    "tables": [
      [
        ["Cell 1-1", "Cell 1-2"],
        ["Cell 2-1", "Cell 2-2"]
      ],
      [
        ["Another Cell 1-1", "Another Cell 1-2"]
      ]
    ]
  }
}
The response contains a list of tables extracted from the document. Each table is represented as a 2D array of rows and columns.
Pending Response
{
  "message": "The analysis is still in progress. Please try again in a few moments.",
  "data": {}
}
If the analysis is not yet complete, the server will return this response with a status code of 202 Accepted.
Result Retention
Analysis results are stored on the server and available for download for 7 days after the analysis completion. After this period, the results are automatically deleted and a new document upload and analysis will be required.
Analysis Wizard
This endpoint provides an interactive, web-based wizard that guides the user through the document analysis process. It returns an HTML view, which can be embedded as an iframe in your own application. The wizard handles the uploading, processing, and selection of data from analyzed documents in a user-friendly way.
The wizard integrates with the other endpoints of this API:
- Upload Document: Initial step where the user uploads their document.
- Get Document Analysis Results: Fetches the raw OCR-extracted tables.
- Subsequent steps allow the user to map identifier and quantity columns, select which rows to use, and ultimately integrate this data into their cart or export it.
Endpoint Details
| Endpoint: | /api/document/analysis-wizard |
| Method: | GET / POST |
| Response Type: | HTML (a rendered view) |
| Header | Description | Example |
|---|---|---|
X-Api-Key |
Your public API key to identify your application. | PUBLIC_SNYEHshjQsOxsuvvlYFzrw |
X-Timestamp |
The current UNIX timestamp in seconds. | 1734209240 |
X-Signature |
A signature generated using your secret key and the timestamp. | jhJXLxnfY7NFSrfrVEAcbPOw3lxcdqYz9MXJLwO8DbI= |
Accept-Language |
Specify the desired interface language. If not provided, English will be used as default.
See Supported Languages for available options. |
de
|
Parameters
| Parameter | Type | Description | ||||||||||||||||
|---|---|---|---|---|---|---|---|---|---|---|---|---|---|---|---|---|---|---|
identity |
string (optional) | An optional identifier that helps track the usage of the analysis in your account's usage section. Maximum length: 255 characters. | ||||||||||||||||
theme |
string (optional) |
Theme name. Customizes the visual appearance of the Analysis Wizard. You can choose from several predefined themes to match your application's design. See themes section. |
||||||||||||||||
quantityParsingMode |
string (optional) |
Determines how quantity values are parsed. Available modes:
Note: The parameter is case-insensitive. If an invalid mode is provided, it defaults to
NUMBER_ONLY.
Examples:
|
||||||||||||||||
showExportDownloadButtons |
boolean (optional) | Displays CSV or JSON download buttons on the final step (Default: false). |
How to Integrate
The wizard endpoint requires valid signatures and headers, so you cannot simply point an <iframe> directly to it. Instead:
- Use your backend to generate a valid signature and fetch the wizard's HTML using those credentials.
- Insert the retrieved HTML into your iframe using
srcdoc. - Handle communication with the wizard via
window.postMessage. This includes responding to signature requests and handling product selections.
Here’s an example flow:
- You fetch the wizard’s HTML from
/api/document/analysis-wizard(with proper authentication) and store it in a variableiframeContent. - You set
srcdoc={iframeContent}on your iframe to render the wizard. - When the wizard needs a new signature, it sends a
REQUEST_SIGNATUREevent to your window. You then call your backend to get a fresh signature and reply withNEW_SIGNATURE. - Once the user selects products at Step 3 and clicks "Confirm Selection", the wizard sends a
PRODUCTS_SELECTEDevent. At this point, you have the chosen products and can decide how to proceed. If you close the wizard now, the process ends here. If you let the user continue, they reach Step 4 in the wizard. - At Step 4, if the user chooses "Add to Cart", the wizard sends a
PRODUCTS_SELECTION_CONFIRMEDevent. This typically indicates the final confirmation of the selected products, allowing you to add them to the cart or finalize the process.
<!-- Example Iframe: Insert the fetched wizard HTML via srcdoc -->
<iframe
        id="analysisWizard"
        srcdoc="{your-injected-html-here}"
></iframe>
// Set up communication handlers
let wizardWindow = null;

// Once the iframe loads, store its window reference
document.getElementById('analysisWizard').onload = function() {
  wizardWindow = this.contentWindow;
};

// Handle events from the wizard
window.addEventListener('message', async (event) => {
  if (!wizardWindow || event.source !== wizardWindow) return;

  switch (event.data.type) {
    case 'REQUEST_SIGNATURE':
      // Wizard needs a new signature (e.g., token expired)
      try {
        const response = await fetch('/your-signature-endpoint', {
          method: 'POST',
          headers: { 'Content-Type': 'application/json' }
        });
        const { signature, timestamp } = await response.json();

        // Reply with NEW_SIGNATURE so the wizard can continue
        wizardWindow.postMessage({
          type: 'NEW_SIGNATURE',
          signature,
          timestamp
        }, '*');
      } catch (error) {
        console.error('Failed to generate signature:', error);
      }
      break;

    case 'PRODUCTS_SELECTED':
      // User finished selecting products at Step 3
      const selectedProducts = event.data.products;
      console.log('Products selected:', selectedProducts);
      // Here you can decide:
      // - Close the wizard and use these products immediately
      // - Or let the user proceed to step 4 by leaving the wizard open
      break;

    case 'PRODUCTS_SELECTION_CONFIRMED':
      // User confirmed selection at Step 4 (e.g., clicked "Add to Cart")
      const confirmedProducts = event.data.products;
      console.log('Products selection confirmed:', confirmedProducts);

      // Add products to cart or perform another final action
      try {
        await addProductsToCart(confirmedProducts);
        showSuccessMessage('Products added to cart successfully!');
      } catch (error) {
        showErrorMessage('Failed to add products to cart');
      }
      break;
  }
});

// Helper functions
function showSuccessMessage(message) {
  // Display success notification
}

function showErrorMessage(message) {
  // Display error notification
}

async function addProductsToCart(products) {
  // Implement your cart addition logic
}
Iframe Communication Events
The wizard and the parent application communicate via window.postMessage events.
Each event has a specific direction, trigger, required action, and data format.
| Event | Direction | Data Format | Trigger | Action Required |
|---|---|---|---|---|
REQUEST_SIGNATURE |
Wizard → Parent | None | When signature expires or is missing | Parent must reply with NEW_SIGNATURE |
NEW_SIGNATURE |
Parent → Wizard | JSON object with signature and timestamp |
In response to REQUEST_SIGNATURE |
Wizard updates internal keys and continues |
PRODUCTS_SELECTED |
Wizard → Parent | JSON array of products | After user selects products (Step 3) | Parent can process immediately or proceed to Step 4 |
PRODUCTS_SELECTION_CONFIRMED |
Wizard → Parent | JSON array of products | When user finalizes selection at Step 4 | Parent finalizes the process (e.g., add to cart) |
Data Format Examples
Below are code samples demonstrating the payload formats for NEW_SIGNATURE, PRODUCTS_SELECTED,
and PRODUCTS_SELECTION_CONFIRMED events.
NEW_SIGNATURE Payload
{
  "signature": "jhJXLxnfY7NFSrfrVEAcbPOw3lxcdqYz9MXJLwO8DbI=",
  "timestamp": 1734209240
}
PRODUCTS_SELECTED / PRODUCTS_SELECTION_CONFIRMED Payload
{
  "products": [
    {
      "productIdentifier": "SW0001",
      "quantity": 1
    },
    {
      "productIdentifier": "BC0321",
      "quantity": 2
    }
  ]
}
User Interface Overview
The wizard guides the user through a four-step process. Each step is designed to be intuitive, allowing the user to easily upload a document, wait for analysis, select relevant data, and finalize their selection.
Step 1: Upload Document

In the first step, the user uploads their document. The wizard supports PDFs and image formats such as JPEG, PNG, and TIFF.
- User selects a file from their device.
- Initiates the upload to begin processing.
Technical Integration: This step interacts with the
/api/document/upload endpoint to handle file uploads.
Step 2: Processing
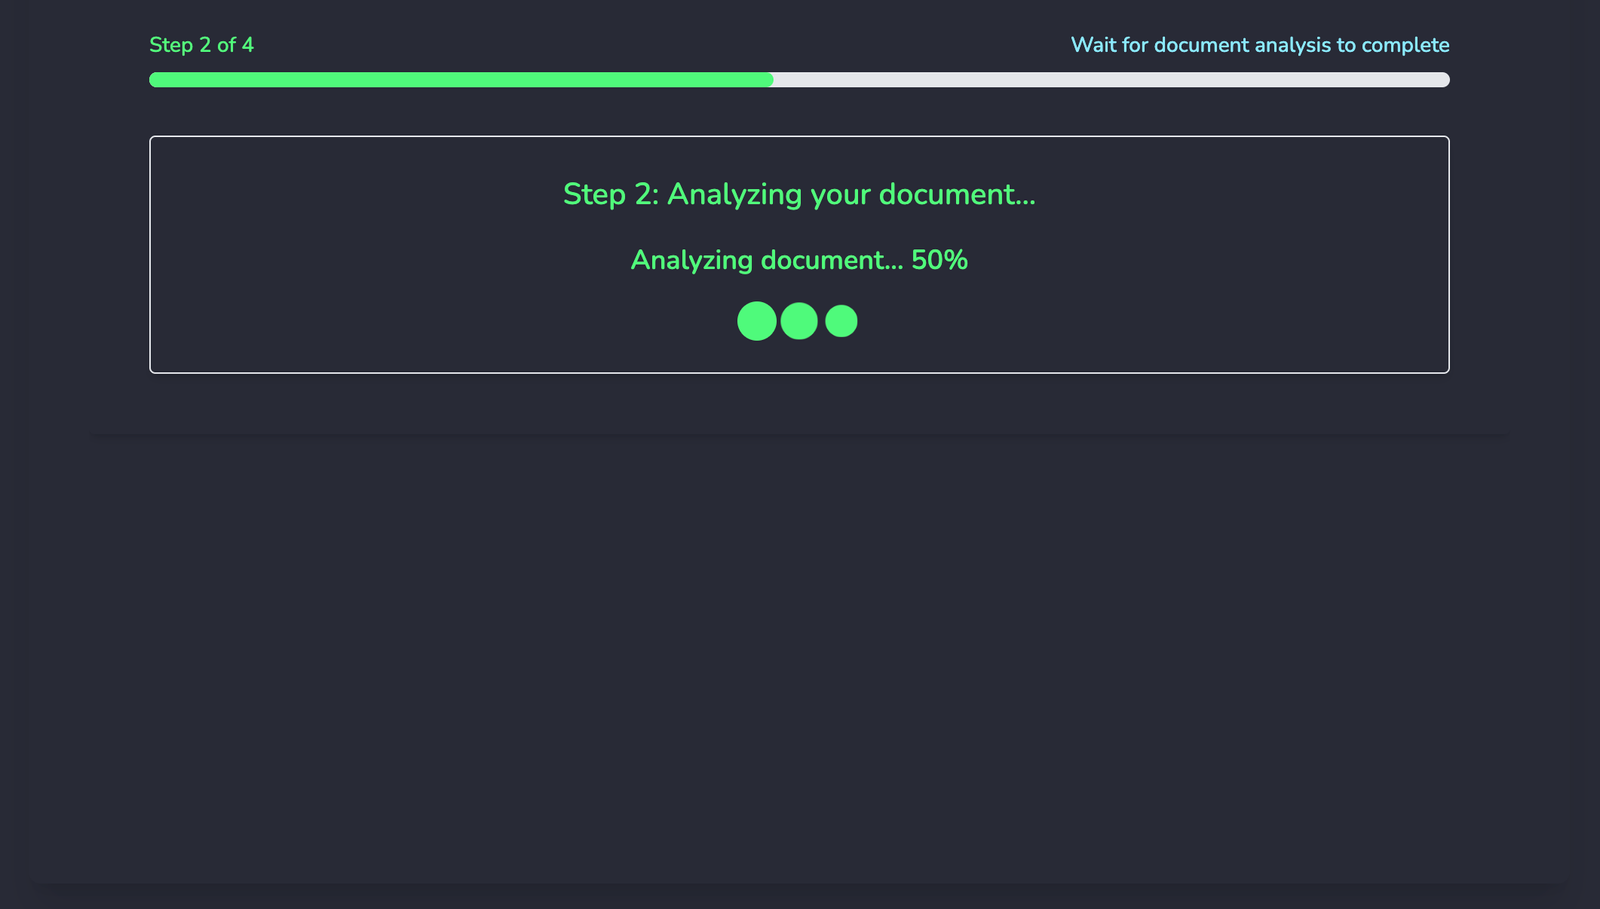
The wizard processes the document using Optical Character Recognition (OCR) and displays a progress indicator. The user simply waits during this phase.
- Progress is updated dynamically until analysis completes.
Technical Integration: This step coordinates with the
/api/analysis/results endpoint, periodically polling for analysis completion.
Step 3: Review Results
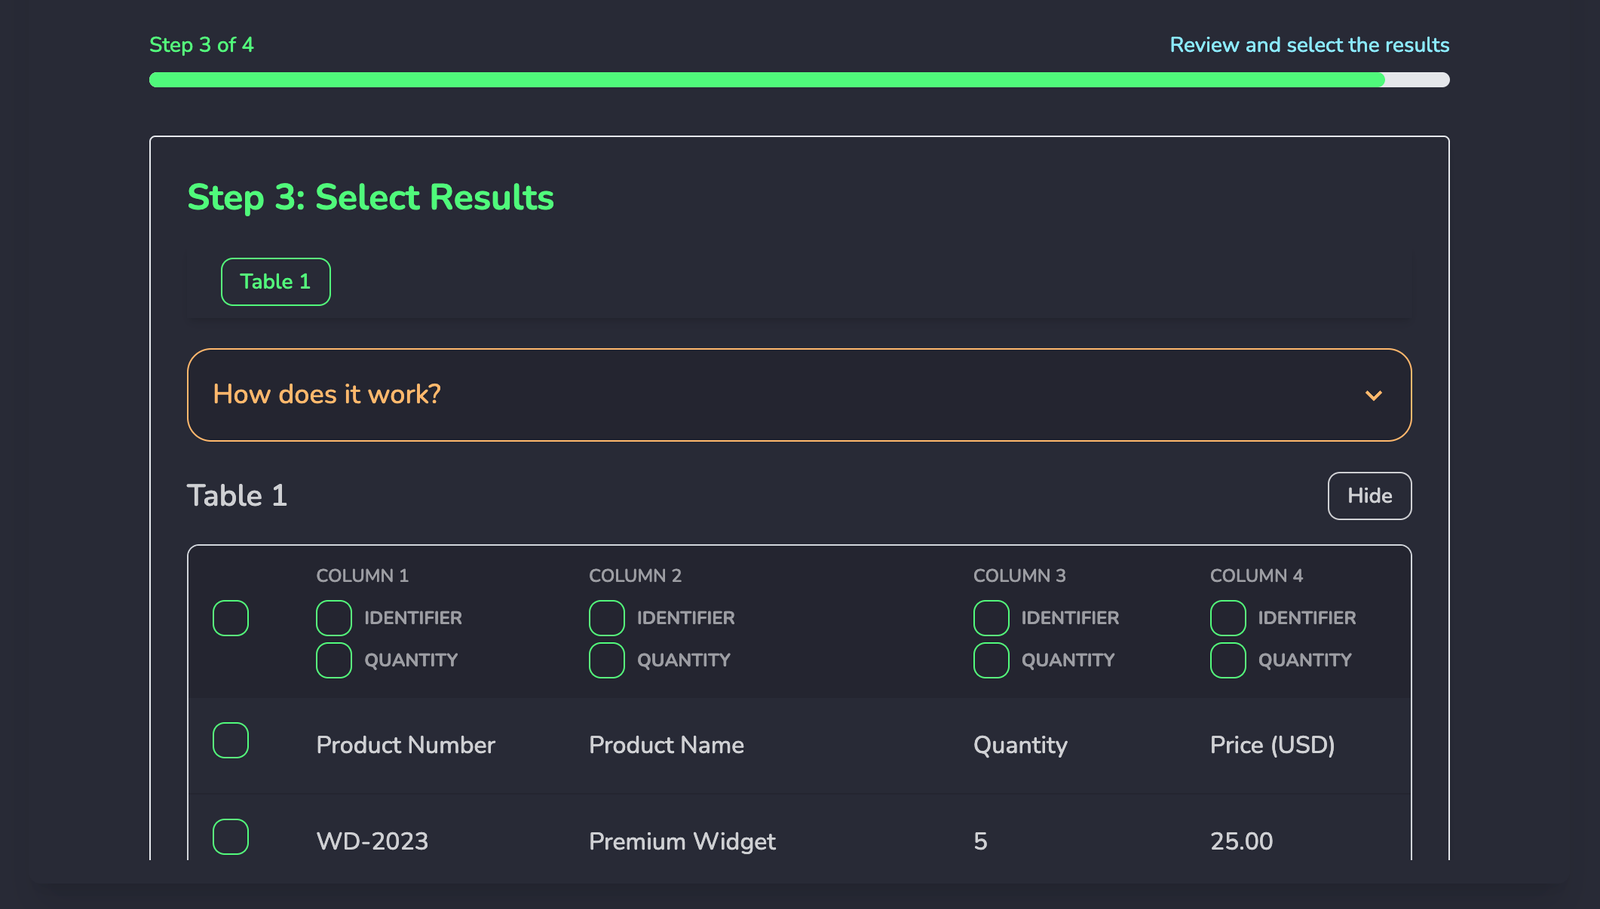
Once the analysis is completed, the wizard displays pre-processed tables extracted from the document. At this stage, the OCR analysis is finished, and the user focuses on refining the results by selecting relevant data.
- Choose which columns correspond to
productIdentifierandquantity. - Select specific rows that should be included in the final output.
- Easily navigate between tables using quick navigation buttons.
- Click Confirm Selection to finalize the chosen data for further processing.
Technical Notes:
- Triggering
PRODUCTS_SELECTEDsends the selected products to the parent application for further handling. - This step integrates responsive Vue components to provide an interactive and dynamic selection experience.
Step 4: Confirmation & Export
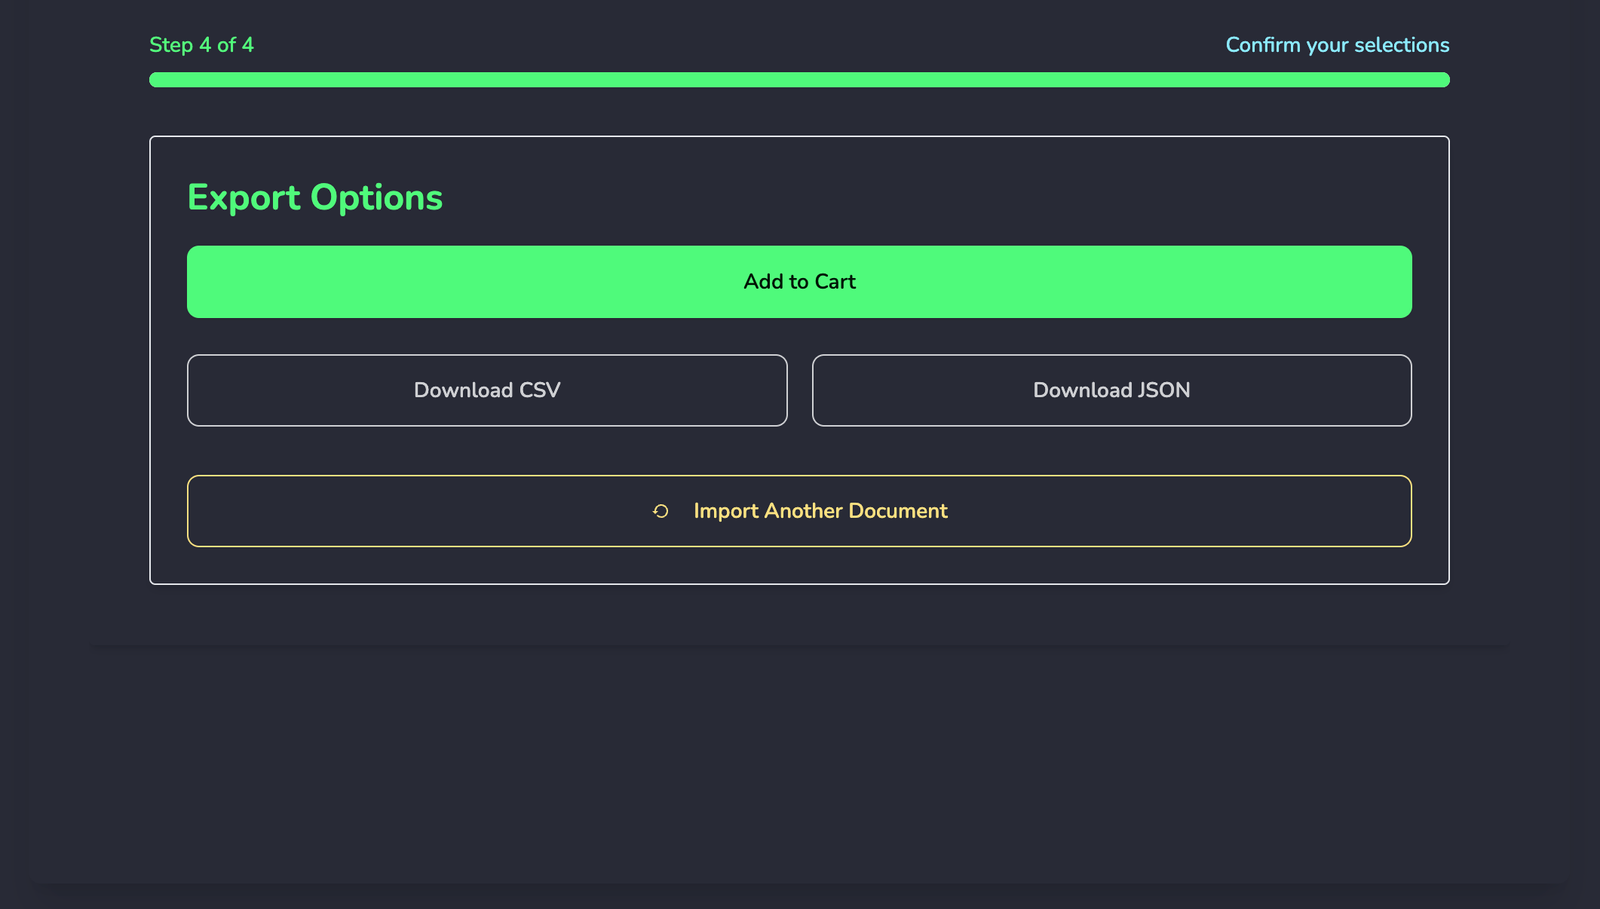
The final step allows the user to confirm their selected products, export the results, or restart the process.
- Export the selected products as a CSV or JSON file.
- Trigger the
PRODUCTS_SELECTION_CONFIRMEDevent to integrate the products into the cart. - Start a new analysis by resetting the wizard.
Technical Integration: The wizard sends the
PRODUCTS_SELECTION_CONFIRMED event to the parent application.
This concludes the workflow, and the products can now be processed further in your system.
Supported Languages
The wizard interface can be displayed in multiple languages. You can specify the desired language using The Accept-Language HTTP header
Available Languages
| Language Code | Language |
|---|---|
en | English (default) |
pl | Polish |
de | German |
es | Spanish |
fr | French |
it | Italian |
nl | Dutch |
da | Danish |
fi | Finnish |
no | Norwegian |
Themes
The Analysis Wizard supports multiple themes to help match your application's design. You can specify the desired theme using the theme parameter when requesting the wizard view.
Available Themes
| Theme Name | Description | Best For |
|---|---|---|
night |
A modern dark theme with high contrast. | Dark mode applications or low-light environments. |
light |
A clean and traditional light theme. | Universal use cases with high contrast needs. |
retro |
A vintage-style theme with classic tones. | Applications with retro or nostalgic aesthetics. |
forest |
Inspired by nature with a dark palette. | Environmental or nature-focused interfaces. |
sunset |
A warm theme evoking the colors of a sunset. | Creative and visually striking applications. |
lunar |
A minimalist dark theme with soft tones. | Modern interfaces focusing on readability. |
sandstorm |
A desert-inspired theme with warm light tones. | Applications with subtle light aesthetics. |
Theme Preview
Step 3: Select Results
This tool allows you to manage tables and select specific columns and rows for processing.
- Select one column as Identifier.
- Optionally, select one column as Quantity. If not selected, all products will have a default quantity of 1.
- Check or uncheck individual rows, or select all rows in the table.
- Edit rows if needed. Double-click a cell on desktop or use "Edit" on mobile.
- Use the "Confirm Selection" button to finalize your choices and move to data export view.
You can also hide and show tables using the "Show/Hide" button for better organization.
|
Column 1
|
Column 2
|
Column 3
|
|
|---|---|---|---|
| ABC123 | Wireless Mouse | 2 | |
| DEF456 | USB-C Cable | 3 | |
| GHI789 | Power Bank | 1 | |
| JKL012 | Keyboard | 1 |
Advanced Configuration
The Analysis Wizard supports advanced configuration options that allow you to preselect columns, handle complex table layouts, and customize the processing behavior. These configurations are passed as a JSON object in the request body when using POST method.
Note: Advanced configuration requires sending a POST request with JSON payload to the wizard endpoint. This is typically used for integration scenarios where you need to pre-configure the wizard behavior.
Configuration Object Structure
{
  "configuration": {
    "quantityParsingMode": "EXTRACT_NUMBER",
    "columnTypes": ["text_no_spaces", "text_unknown_spaces", "number", "float"],
    "showExportDownloadButtons": false,
    "theme": "night",
    "appendQuantityColumn": null,
    "preselectConfiguration": {
      "columnCount": 3,
      "identifierColumn": 0,
      "quantityColumn": 2,
      "skipHeader": true,
      "ignoreTablesWithDifferentColumnsCount": true,
      "proceedAutomaticallyIfAllPreselected": false,
      "emptyCellPolicy": "SKIP_IF_BOTH_EMPTY"
    }
  }
}
Main Configuration Parameters
| Parameter | Type | Description | Default |
|---|---|---|---|
quantityParsingMode |
string | How quantity values are parsed from documents | "EXTRACT_NUMBER" |
columnTypes |
array | Expected column types for regex-based column detection | [] |
showExportDownloadButtons |
boolean | Show CSV/JSON export buttons in final step | false |
theme |
string | Visual theme for the wizard interface | "light" |
appendQuantityColumn |
integer|null | Add an extra quantity column with specified default value | null |
Column Types
The columnTypes array helps the system understand the expected structure of your documents when columns are merged together during OCR processing. This is particularly useful for complex table layouts where the OCR has incorrectly combined multiple columns into one.
Available Column Types:
number- Pure numeric values (integers)float- Decimal numbers and floating-point valuestext_unknown_spaces- Text content with variable spacingtext_no_spaces- Text without any spaces (e.g., product codes, SKUs)text_1_space- Text with exactly one space (e.g., "Brand Name")text_2_spaces- Text with exactly two spaces (e.g., "First Middle Last")char- Single character values (e.g., status codes, categories)
Use Case: When OCR merges columns together, you can specify the expected column types to help the system split them using regex patterns.
Example: If a merged column contains "ABC123 Premium Widget 2.5" and you specify ["text_no_spaces", "text_unknown_spaces", "float"], the system will attempt to split it into separate "ABC123", "Premium Widget", and "2.5" columns.
Column Types Examples
"SKU123 Product Name 1.99"
["text_no_spaces", "text_unknown_spaces", "float"]
Column 1:
"SKU123"Column 2:
"Product Name"Column 3:
1.99
Note: Column types are used for regex-based splitting when the OCR system detects merged columns. The order of types in the array corresponds to the expected order of data in the merged content. This feature works best with consistent document layouts.
Preselect Configuration
The preselectConfiguration object allows you to automatically configure the wizard's column selection and processing behavior, reducing manual user interaction.
| Parameter | Type | Description | Validation |
|---|---|---|---|
columnCount |
integer | Expected number of columns in the table | Minimum: 2 |
identifierColumn |
integer | Zero-based index of the identifier column | 0 ≤ value < columnCount |
quantityColumn |
integer | Zero-based index of the quantity column | 0 ≤ value < columnCount, ≠ identifierColumn |
skipHeader |
boolean | Whether to skip the first row as header | - |
ignoreTablesWithDifferentColumnsCount |
boolean | Skip tables that don't match the expected column count | - |
proceedAutomaticallyIfAllPreselected |
boolean | Auto-proceed to final step if all selections match presets | - |
emptyCellPolicy |
string | How to handle empty cells in the table | See Empty Cell Policies |
Empty Cell Policies
The emptyCellPolicy parameter determines how the system handles rows with empty cells in identifier or quantity columns.
SKIP_IF_BOTH_EMPTY (Recommended)
Skip rows where both identifier and quantity cells are empty. Rows with only one empty cell are processed with fallback values.
FALLBACK_TO_ONE
Use quantity "1" for empty quantity cells and skip rows with empty identifiers. More permissive than other policies.
WARN_IF_QUANTITY_EMPTY
Include rows with empty quantities but flag them with warnings. Useful for manual review scenarios.
Usage Examples
Simple Column Preselection
{
  "configuration": {
    "preselectConfiguration": {
      "columnCount": 3,
      "identifierColumn": 0,
      "quantityColumn": 2,
      "skipHeader": true,
      "ignoreTablesWithDifferentColumnsCount": false,
      "proceedAutomaticallyIfAllPreselected": false,
      "emptyCellPolicy": "SKIP_IF_BOTH_EMPTY"
    }
  }
}
Complex Configuration with Column Types
{
  "configuration": {
    "quantityParsingMode": "EXTRACT_NUMBER",
    "columnTypes": ["text_no_spaces", "text_unknown_spaces", "number", "float"],
    "theme": "night",
    "showExportDownloadButtons": true,
    "appendQuantityColumn": 1,
    "preselectConfiguration": {
      "columnCount": 4,
      "identifierColumn": 0,
      "quantityColumn": 2,
      "skipHeader": true,
      "ignoreTablesWithDifferentColumnsCount": true,
      "proceedAutomaticallyIfAllPreselected": true,
      "emptyCellPolicy": "FALLBACK_TO_ONE"
    }
  }
}
Validation Rules
- Column count must be at least 2
- Column indices must be within the valid range (0 to columnCount-1)
- Identifier and quantity columns cannot be the same
- appendQuantityColumn value must be at least 1 if specified
- All enum values must match the accepted options
- Column type text_unknown_spaces can occur at most once
Check User Limit
This endpoint retrieves the current user's available page limit and subscription status. Additionally, it can be used for testing API connectivity and validating authentication.
Endpoint Details
| Endpoint: | /api/limit |
| Method: | GET, POST |
| Header | Description | Example |
|---|---|---|
X-Api-Key |
Your public API key to identify your application. | PUBLIC_SNYEHshjQsOxsuvvlYFzrw |
X-Timestamp |
The current UNIX timestamp in seconds. | 1734209240 |
X-Signature |
A signature generated using your secret key and the timestamp. | jhJXLxnfY7NFSrfrVEAcbPOw3lxcdqYz9MXJLwO8DbI= |
Success Response
{
  "message": "ok",
  "data": {
    "availablePages": 1000,
    "hasSubscription": true
  }
}
The response contains the number of available pages the user can use and whether the user has an active subscription.
Implementation Examples
Basic PHP Integration Example
This example demonstrates a straightforward integration of the Doc2Cart Wizard using PHP and JavaScript. Perfect for understanding the basics and getting started quickly.
Key Features:
- Basic Wizard iframe implementation
- API signature generation example
- Event handling and communication
- Products selection handling
- Simple authentication flow
Shopware 6 Integration Example
Advanced integration example showing how to implement Doc2Cart Wizard within a Shopware 6 environment. This example demonstrates a complete e-commerce integration including cart functionality.
Implementation Features:
- Full Shopware 6 plugin structure
- Cart integration
- Shopware-specific API implementations
This example requires basic knowledge of Shopware 6 plugin development.